Logo

1972 johnson 20hp needle idle too rich ?

dkonrai

Regular Contributor
long story, but i just bought a 72 johnson 20hp short shaft. it runs and starts easy. issue is the low idle. i have the motor running pretty well, but, its only out about a 1/4 - 1/2 turn. any more and it dies due to over rich settings. plugs are pretty wet so i know its running rich. when i took apart the carb, it had a new float and looks like it was rebuilt. i took out all the plugs and blew them out, and reset the float level, installed new seat and float valve.

i have spark (1 new coil)
110/110 psi, cleaned and rebuilt carb with omc parts.
a fuel pump that i pulled from a running motor.
new hoses, including the crankcase hoses.

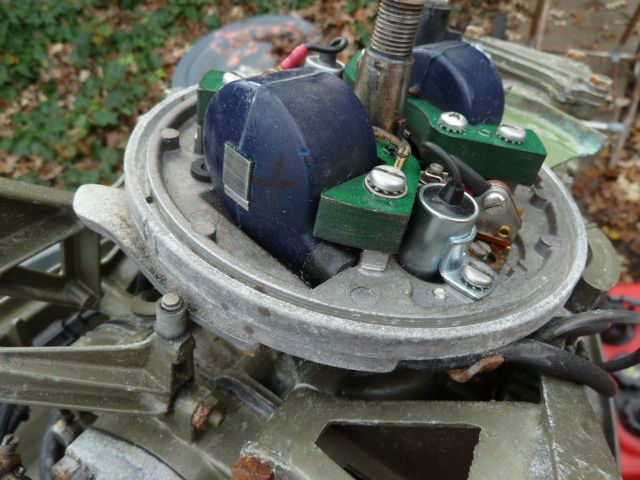
here are some photos. the bearing doesnt fit (?) . i can see way down the body that there seems to be a collar that would accept a sleeve (bearing) but what is the stupid part number??? i ordered the part number listed but as you can see there is no way this is gonna fit.
DSCN0147.jpg

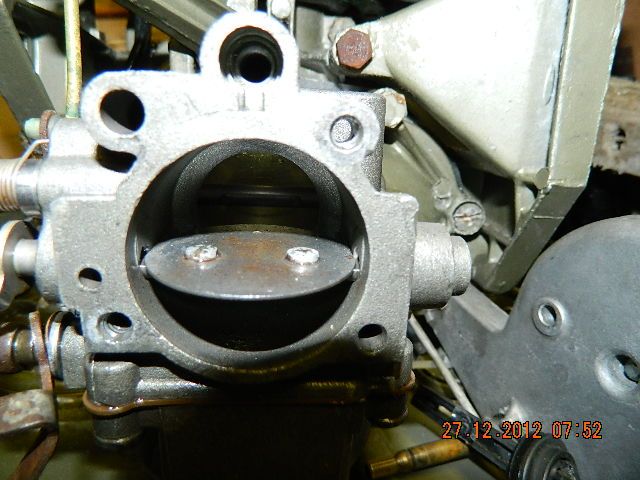
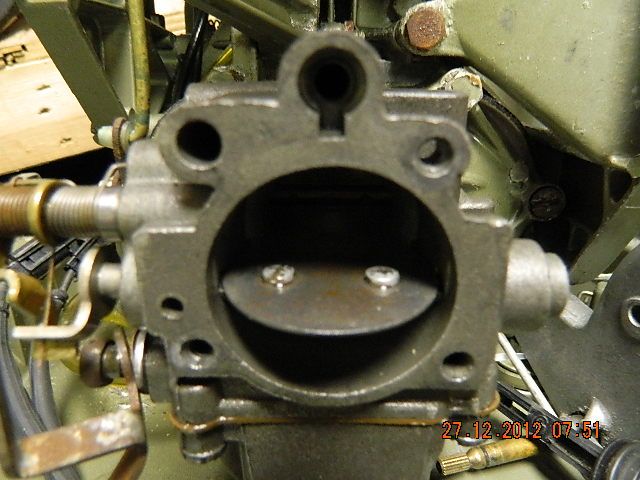
dont know if this shows the carb body
DSCN0144.jpg

DSCN0139.jpg


when i pulled the needle this morning, i noticed it was only a 1/4 turn out. all of the other jonnyrude carbs i have worked on the 1 1/2 turn was always pretty close.
arrrggghhhh
dino
 
314166 is the right part number for that white nylon bearing. Did you remove the old one first? I've always used a very small tap to go in there to grab the old bearing and pull it out.

Check to see if the high speed jet is the right part number. The size would be imprinted on the side of it. (I don't have that book).

Is the small round gasket installed on the vertical brass high speed nozzle? If not, that would allow fuel to be siphoned into the crankcase making an adjustment impossible.
 
Sounds pretty good you should be able to idle it down to a crawl around 650 rpm. Be sure and add 1/4 turn rich once you get the highest lean rpm possible. set the idle speed and do it again. I like to run it hard WOT first then idle down in gear and adjust the slow needle in clockwise until it stumbles and back out for a nice smooth idle. Then add 1/4 turn rich and center the knob stop to stop. Looks like the return spring on the pull start needs cleaning. May as well get some new rope for it while you have it apart its pretty important that works out there.

thanks! i think it needs a little fine tuning. i have yet to "set" the points. i didnt change the points or condensers due to the fact it is really clean under the hood. my daughters accord is in the way of getting my 14 footer out. it (accord) wont start and the car is in front of the tinny.
dino
 
Does the accord have air in the tires? You can make a spark gap tester or buy a cheap one at the parts store. If it jumps a gap of 3/8 inch it should be good new plugs wouldnt hurt. While your waiting for her car to fix itself did you check the link and sync for your motor normally you want the roller to begin to open the carb butterfly when the mark on the cam is center of the roller then with it in gear go WOT and the advance should be fully to its stop and the throttle butterfly should be fully open. I will check for your motor.

yup :) strange, the older jonnyrudes have no real fine adjustment. its just a clamp on the butterfly shaft. need to get the motor to idle down lower. but after a few runs it may get better?

as for spark tester i have one or two. prob is when you turn the key, no sound or anything. battery is good full charge. maybe ignition switch or starter? who knows. i hate working on cars. ob are so much easier. :)
dino
 
ok thanks for the tips. i ran the carb base on some 150 grit (had it laying around) base was pretty flat. nice even sanding on a plate of glass.
as for the link n sync most challenging to do this when the roller doesnt have the fine adjustment screw like the later models. strange how the roller is really small in diameter as well. it may be a timing issue or the fact that i kinda smushed the bearing. its a little loose around the needle. hoping that its ok. if not i know that someday im going to have to replace that bearing bushing.

i still need to check the points, pull the flywheel and check to see if she is firing at the correct times.

dino
 
Just use a timing light and aim it at the 2 vertical lines on the magplate.-That is how you can check the timing.Check both cylinders.-----------The single timing mark on the flywheel will show up as well, should be between those 2 lines.
 
Just use a timing light and aim it at the 2 vertical lines on the magplate.-That is how you can check the timing.Check both cylinders.-----------The single timing mark on the flywheel will show up as well, should be between those 2 lines.

i assume that the timing can be checked at idle speed?

dino
 
The concept is not the same as an old chevy V-8.----------This is an outboard magneto !!-----------The spark should and will always occur between those 2 marks , idle to full throttle.
 
Last edited:
(Magneto Armature Plate)
(J. Reeves)

If the armature plate has a a loose fitting, wobbling motion (the plate that the points, coils etc are attached to), it is usually caused by a slightly worn support ring. This allows the point setting to change erratically as the armature plate turns.

The cure is to remove the armature plate so that the support which is attached to the powerhead with 4 screws is visible. Then, with a screwdriver and hammer, or some tool of your choosing, and looking straight down at the support ring, make an indentation at what would be called the 12, 3, 6, and 9 O'clock positions. Install the armature plate and check for a smooth turning wobble free movement.

You may need to do that procedure a few times to obtain the proper fit (not too tight, not too loose), but it's worth the effort.

Use a small amount of anti corrosive grease between the aluminum ring and the brass support plate and also on the brass bushing of the armature plate when all is well.

Thousands of parts in my remaining stock. Not able to list them all. Let me know what you need and I'll look it up for you. Visit my eBay auction at:

http://shop.ebay.com/Joe_OMC32/m.html?_dmd=1&_ipg=50&_sop=12&_rdc=1
 
Actually the timing for your motor is fixed with point gap. Make sure the armature plate goes all the way to its stop at WOT. When you changed the coil did you pull the armature plate. If not it will fail over time the proper way is to push the wire and boot all the way into the coil then mount the coil on the plate. I allways replace both coils because it is labor intensive. Take a picture of the bottom of the armature plate so you know how it goes back together. Also if you can wiggle the armature plate up and down even a little it will throw the timing off get a new ring and mount plate to put it back together with. Adjust the points where .020 will fit snug but .022 wont and make sure the flywheel nut is torqued to 45ft lbs before you start the motor. Once you tighten the upper end up it shoud purr like a kitten after you dial in the carb.

errr no, i just removed and reinstalled a spare coil i had laying around. looks like i am going to be pulling the flywheel again. thanks for the tip.
this is when i first pulled the flywheel. i was pretty happy to see that it looked pretty clean, and the coils looked good (even tho the lower was bad)
P1040766.jpg

P1040768.jpg

since it looks like i will be pulling the flywheel again, and removing the armature plate.... guess i will be resetting the points. need to buy another light tester so i can time the motor.
ahh wish me luck.
 
You can use the two vertical marks on the magplate and the 2 marks at 180 degrees on the flywheel to set the points for best spark.---feeler gauges are not the absolute best way to do it.------------The folks at -----aomci--------agree with this concept.-One member there even sells the timing fixture ( dummy flywheel ) to do the job the way the factory recommends.
 
yes, i spoke to frank regarding the timing tools, and mag collar. i will probably pick up a pair of coils later. as i have spark in both cylinders (now) i am trying to just get the motor running so i can make a run on the water.
as for setting points, i am using the omc guide, which is to use a ohm meter or continuity light. works pretty good. i dont have the $$ for a timing tool or the coil ring :(
dino
 
(Magneto & Driver Coil Alignment)
(J. Reeves)

To align the coils properly, have the metal vertical portion of the coil yokes aligned with the inside edge of the bevel that exists on the top portion of the aluminum seat upon which the coils sit. This creates the proper distance between the coils and the flywheel magnets. Faulty alignment creats friction and the yokes of the coils heat up, turn blue and expand.

(Point Setting Of Magneto Models)
(J. Reeves)

Set the points as follows. Have the flywheel key aligned with the fiber rubbing portion of the ignition points. Adjust the gap so that a .020 gauge will pass thru but a .022 will not. Should there be any question of the points being dirty (touching the contact with your finger would cause them to be dirty), clean them with a small brush and acetone or lacquer thinner.

NOTE 1:
Should the operating cam have a small portion on it with the word "SET" imprinted, align this portion with the fiber rubbing portion instead of the flywheel key.

NOTE 2:
Should the cam have the word TOP imbossed on the top of it, that is a cam that could be installed upside down and this is simply telling you which side is up. It is not a position where one would set the points.

Thousands of parts in my remaining stock. Not able to list them all. Let me know what you need and I'll look it up for you. Visit my eBay auction at:
http://shop.ebay.com/Joe_OMC32/m.html?_dmd=1&_ipg=50&_sop=12&_rdc=1
 
Last edited:
If you want to use the timing light you need a tach and run it at 1000 rpm to retard the timing gap the points wider to advance the timing gap the points smaller. I did some research on your motor and the 20 hp is just a detuned 25 hp the only difference being the high speed jet size. Yours has the 67D and the 25hp has the 72D. The carb, powerhead, intake manifold and exhaust tube are all the same. You can increase HP just by changing the high speed jet you may need a prop with more pitch also if it revs to high at WOT.

wow thats some really good intel! actually GREAT INTEL! crazy that all i need to do is replace the high speed nozzle. looks like i am going to order somemore parts :)

as for using the timing light, i dont own a tiny tach yet so i can estimate the rpm's. great tip however. i do own the timing light for my 45hp merc. funny how we dont need them for cars anymore.
dino
 
Post # 21 says that you can use your flywheel to set the points accurately.-----The factory fixture is only a shop time saver.---------------So find the 2 marks on your flywheel.-------Lock the magplate at full throttle / against the shift interlock / or full retard at idle as it does not matter.----Install flywheel ( without the nut) .---------Rotate the flywheel so that timing mark is betweem the 2 lines.--Determine which cylinder is in the firing position --Lift flywheel off and set those points to open using an ohmeter.
 
Post # 21 says that you can use your flywheel to set the points accurately.-----The factory fixture is only a shop time saver.---------------So find the 2 marks on your flywheel.-------Lock the magplate at full throttle / against the shift interlock / or full retard at idle as it does not matter.----Install flywheel ( without the nut) .---------Rotate the flywheel so that timing mark is betweem the 2 lines.--Determine which cylinder is in the firing position --Lift flywheel off and set those points to open using an ohmeter.

this is the way i have been fine tuning the older motors. i didnt know i could just set them at .20 and call it done. i believe kimcrbr, about the setting of points. i just thought that it was really important to make sure when the points opened, as well as the 180 degrees of when the points open.
dino
 
If you want to use the timing light you need a tach and run it at 1000 rpm to retard the timing gap the points wider to advance the timing gap the points smaller. I did some research on your motor and the 20 hp is just a detuned 25 hp the only difference being the high speed jet size. Yours has the 67D and the 25hp has the 72D. The carb, powerhead, intake manifold and exhaust tube are all the same. You can increase HP just by changing the high speed jet you may need a prop with more pitch also if it revs to high at WOT.
it looks like the high speed needle is set and cant be changed. (wondered why i could not get it out with a screw driver) might be pressed in? so that means if i want to increase to a 25, i have to find another carb. think i have found one, and its alot cheaper than finding a 15 jonnyrude carb.
dino
 
My old 57 35hp johnson had a access panel on the flywheel you could adjust the points without pulling the flywheel. I put that flywheel on my 1961 lark III 40hp as well as the carb and have the electric choke as well as high and low needle adjusters. I also put the generator on it as well that was fun getting the parts together. I just love these old engines tune ups are simple set the points change the plugs and go.

had a few older 3hp, and a 64 5.5 that had the hatch. made for a much easier time with the setting of points. my basic routine,

remove flywheel.

pull coils

remove condenser

run (2) wires from the point contacts out the bottom. i use two wires for both points. i crimped on a round eye so i can screw the wires on the points.

set the flywheel back on and put the ohm meter on one wire, then i rotate the flywheel to see where the points open. and adjust as needed by the timing marks on the flywheel. i didnt or have not opened the throttle wot, or low idle. does this matter?
dino
 
oh i just run the wires to set the points. i then remove the (2) wires and then put all the stuff back on, coils and condesers. i just wasnt sure if some of the pros did it the dame way?
dino
 
update
it turns out i had two problems.
original carb had a internal leak (?) as i installed a new needle bearing but didnt idle well.
installed a used 25hp carb from omcjoe, installed a new needle bearing, cleaned the carb, nice it had a new needle and float!
it now idles! woohoo. double checked the points, there were at .020.
thank you for all the tips.
future plans will be new coils, points, condenser and a reseal (yup had some pretty bad looking thick ooze out of the lu)
dino
 
it looks like the high speed needle is set and cant be changed. (wondered why i could not get it out with a screw driver) might be pressed in?

No, it's not pressed in, it's screwed in via 1/4x20 threads. Unless you've broken the flanges off that a screwdriver fits in, many float chambers need to be in a vice where heat can be applied to help loosen that brass jet. Also, it's not a high speed needle... it's a brass jet with a fixed ID.
 
No, it's not pressed in, it's screwed in via 1/4x20 threads. Unless you've broken the flanges off that a screwdriver fits in, many float chambers need to be in a vice where heat can be applied to help loosen that brass jet. Also, it's not a high speed needle... it's a brass jet with a fixed ID.

on the old carb, i tried a little and realized it wasnt going to budge. thanks for the heat tip. now where can i buy a high speed jet?
 
i think i will leave the original carb alone, or give it a try in the distant future. finally have a carb working :)
she idles woohoo!
 
Back
Top