Logo

Honda 9.9 starting issue

Jim Broadhurst

New member
My engine will start and idle for about 10 seconds. I change fuel filter with no change in starting issue. If I pump on fuel line blub it runs a little longer before dieing. All connections and connector valves seem to be fine on fuel line to gas tank. I pulled the fuel filter and it seems to have vacuum, but I can't open it up to check diaphram because of star shaped screws that hold it together. any suggestions.
 
When fuel is left sitting in these carburetors it tends to plug up the small passage ways and jets.-----------You should try to clean the carburetor and it is not that hard to do.
 
I would be happy to "walk" you through the carburetor rebuild process but you are correct to first determine if you have sufficient fuel flow from the pump (which, I believe you referred to as a filter).

First things first.
What year is your Honda?
Electric start?
Remote control?
Manual or electric choke?

You say that pumping the primer bulb seems to improve the condition. Does the primer bulb stay hard during the time it runs or does it go "soft"? If it doesn't stay as hard as the last squeeze you gave it to prime then you need to find out why that is occurring. Those bulbs go bad and the hoses, to and from the bulb, can develop leaks that allow air into the system.

You don't need to disassemble the pump, typically, to check it's condition. If you simply remove the fuel line going into the carburetor from the pump and then turn the engine over a few revolutions you will see if the pump is delivering fuel. Do this with the ignition kill activated. the system properly primed and any and all precautions for the flammability of gasoline. As in...outside with a fire extinguisher handy.

These things "sip" fuel and if you get a very light stream ( I call it a "gur-burble") from the pump then it is probably ok.

Check that stuff out and then get back to me and we can talk about the carburetor.
 
Last edited:
Thanks for your response and help. It is a 2002, electric start, electric choke, and not remote control. The bulb stays about as hard as the last squeeze. Each time I pulled the starter rope, I got a "gur-burble" coming out of the fuel pump, so it seems to be getting gas. A little history. I bought the boat and motor about 3 months ago. It had been setting unused for a couple of years. The person I bought it from took it to a shop to get it running. The mechanic spent about 2 hours cleaning the carburator. The only charge was 2 hrs of labor. I took it out 3 times, and it ran great each time. I then took it off of the boat about 6 weeks ago and stored it on a stand in my barn for about 6 weeks while I stripped the paint off of the alluminum boat and repainted it. Last week I put it back on the boat and took it out on the water and it didn't run then and hasn't run since except for a few seconds at idle and then dies.
 
Well, sadly, it sounds like a case of "no drain Jane" for the carb. That is too long for these little carburetors to be put up without draining the float chamber. These outboards are the worlds best but this is a particular sore spot that most owners experience while owning one. The carbs are just plain finicky about leaving fuel in them or being fed anything less than pristine clean gasoline. Additives help with questionable fuel but draining them prior to any storage is imperative to keeping them trouble free.

Also, there is a chance that the mechanic didn't do a complete and thorough job of getting the carb clean. Although, it sounds as if he gave it a good go.

You are probably headed toward a good cleaning again. This time though I would suggest replacing an item or two in there that don't always get reused with good results.

Try this first though. Take the fuel feed line off of the float chamber nipple and "power spray" WD-40 in there (use the little red straw) so that it tends to pressurize the chamber. Then let it escape. Do this several times. Then, do the same thing again only this time try to back out the drain screw while there is still a little pressure and allow the fluid to come out of the drain. Do this several times. Reassemble and see how it reacts.

If the results are negative, let me know if you want to tackle rebuilding your own carb. Not hard, just "procedural" in nature.
 
I did the power spray with WD-40 3 times. Trying to start it between each attempt to clean it. Same result as before. It runs at idle for about 5 to 10 seconds. If you can give me some direction, I am willing to rebuild it. I am retired after working in Information Technology for 42 years, so I understand the need to follow procedures. Thanks again for you help.
 
First thing I'll say is that you need to make a decision. If we go through the carb to clean it, you will need to refer to the parts page link below for both direction and for ordering your parts.

http://www.boats.net/parts/search/Honda/Outboard Engine/2002/BF9.9D2 SHSA /CARBURETOR/parts.html

The decision involves do you want to buy a new assembly and just bolt it on and save the old one for cleaning and a spare or do you want to buy the parts I suggest and go through the process?

As you can see, the entire carburetor, item #10, is around $150 plus shipping.

The parts I would be asking you to purchase for the cleaning are items 1-4-11 and 14 times two plus 2 or three cans of spray carb cleaner for a total of around $60 with shipping and driving around.

There are also a couple of parts that are not depicted that you MIGHT need. Look at item #25, cap. It is, in reality, a little rubber boot. If yours gets torn during the process, it will need to be replaced. Also, the non depicted parts are under that boot and comprise the accelerator piston and return spring.

Some guys would opt to just spend the extra $100 to get it over with.

Either way, you may encounter some stubborn bolts and screws that can cause additional damage and cost if you "booger" them up by not taking your time and getting them off carefully. But, since you say the carb was recently worked on, that may go MUCH better than a virgin job.

Let me know what you decide.
 
Hi Jim,
I'm sending you this parts page labeled for a 2006 model because it shows the "hidden" parts I spoke of in my previous post. It also lists the correct part number for your carb while the 2002 page listed both the manual choke model and the auto choke And I thought that might be confusing you. If you aren't already:)

I'm going to use this page for reference from now on since nothing changed between '02 and '06 on the 9.9hp except the clarity of Honda's parts pages.

As you can see, if you compare the two different pictures, the '06 page is clearer and lists the accelerator pump assembly in detail. (Item 14)

Item 12 on this page, the "cap", is what was depicted on the 2002 page as item 25. These were recalled in '05 because they tore so easily. The new ones are much tougher.

http://www.boats.net/parts/search/H...5/BFP9.9D5 XHSA /CARBURETOR (AUTO)/parts.html
 
I have ordered the initial parts you suggested. I will order 25 later if needed. I will let you know how it is going when I get the parts.

Thanks again.

Jim
 
Ok, We'll get started whenever you're ready. Got a decent digital camera? That will help you with remembering how it goes back together. It's simple enough but it never hurts to take pictures along the way.
 
I have received the parts and taken the carburator off and apart. I broke the pilot screw. My shop manual said it required breaking it. It looks like I could have pulled straight up and removed it and used a screw driver to remove the screw, but it is broke now and the manual says to use a pilot screw wrench to remove the screw. Is that something I can buy at Home Depot or do I need to order one from honda? Number 07KMA-MS60101.

Also do I need to order SE thermal valve O-ring?

Thanks again,

Jim
 
Well, sounds like you started without me. Had you asked how to go about it, you probably wouldn't have broken the idle screw. Oh well.

But, that's EXACTLY why I requested that you purchase item #4, the screw set. You do have it don't you?

Now, you are faced with the flat, smooth, head of the idle passage needle valve. The way to get it out is to take a VERY sharp pointed item (I use a dental pick) and poke it on the outer edge until you have a good little "dent" in it.

Then, using the dent to gain purchase for your sharp object, begin trying to rotate the valve counter clockwise. You will need to "walk" it around in this manner until all of the threads have disengaged.

HOWEVER, it can be difficult to tell when the threads are all the way backed off since the valve will still be held in place by the O ring that is on the valve. That O ring tends to act as a sort of "catch" or soft lock that keeps the valve from simply lifting or falling out of the bore.

You have to try and gently pry it out against the hold of the O ring with a couple of small items. Again, I use a dental pick and a small, pocket screwdriver to accomplish this. If it gives you trouble, that is normal. It can be frustrating the first time.

DO NOT FORCE IT OR ANYTHING ELSE on this carburetor. If it doesn't come out with a bit of trying, then it is possible that you don't have the threads all the way backed out. Go back and rotate the head CCW some more to ensure that the threads are disengaged then try prying it up out of the bore.

And no, you typically do not need to replace the autochoke thermal valve O ring unless you see it is badly damaged.

I got the pilot screw out using your instructions, and I did get a new one. Any thing else before I start to put it back together.

Thanks

Jim
 
OHHH YEAH! We(well you actually) have only started having fun. This is where you can make a successful job of it or not.

The carb is basically two main pieces, the body and the float chamber. BOTH are equally important to get COMPLETELY cleaned. This carburetor just won't work if dirt is left in any of the passages of the carb bowl (float chamber) or passages of the main body.

If you have the two separated, let's start by cleaning the bowl. The accelerator piston is in the bowl and needs to come out. It is held in place with a particularly TINY phillips head screw. You need a size "0" driver to get it loose. Sometimes the piston is stuck and needs to be "jarred" loose by turning the chamber upside down and tapping it against a block of wood. Once that piston is out, then you can begin to evaluate how that passage is fed from the float chamber and, then, how that passage feeds the carburetor main passage. If all that passage associated with the accelerator pump is not thoroughly cleaned and verified, the carb will never run right.

A spray can of WD-40 can help you decipher how gas leaves the accelerator chamber and goes up to the main passage. Gas enters the chamber from the float bowl via a small steel ball check valve that is under the piston. It may come out with the piston. If it does, it's not that important, even if you loose it. The gas then will have to exit through the other passage. If you use the WD spray straw and spray through that passage, you will find that it comes gushing out from a hole on the corner of the chamber. That hole mates to a hole in the main body. THAT HOLE AND THAT PASSAGE is one of the keys to getting this carb clean. Put the straw in that hole and flush, flush, flush. If any pressure builds up, the passage is still dirty.

I'll stop here and let you respond as to if you are still with me or if I have said too much.

Also, I just realized that I went right to cleaning the main body and did not tell you to clean all of the little "tunnels" on the bottom of the float chamber.
 
Last edited:
OHHH YEAH! We(well you actually) have only started having fun. This is where you can make a successful job of it or not.

The carb is basically two main pieces, the body and the float chamber. BOTH are equally important to get COMPLETELY cleaned. This carburetor just won't work if dirt is left in any of the passages of the carb bowl (float chamber) or passages of the main body.

If you have the two separated, let's start by cleaning the bowl. The accelerator piston is in the bowl and needs to come out. It is held in place with a particularly TINY phillips head screw. You need a size "0" driver to get it loose. Sometimes the piston is stuck and needs to be "jarred" loose by turning the chamber upside down and tapping it against a block of wood. Once that piston is out, then you can begin to evaluate how that passage is fed from the float chamber and, then, how that passage feeds the carburetor main passage. If all that passage associated with the accelerator pump is not thoroughly cleaned and verified, the carb will never run right.

A spray can of WD-40 can help you decipher how gas leaves the accelerator chamber and goes up to the main passage. Gas enters the chamber from the float bowl via a small steel ball check valve that is under the piston. It may come out with the piston. If it does, it's not that important, even if you loose it. The gas then will have to exit through the other passage. If you use the WD spray straw and spray through that passage, you will find that it comes gushing out from a hole on the corner of the chamber. That hole mates to a hole in the main body. THAT HOLE AND THAT PASSAGE is one of the keys to getting this carb clean. Put the straw in that hole and flush, flush, flush. If any pressure builds up, the passage is still dirty.

I'll stop here and let you respond as to if you are still with me or if I have said too much.

Also, I just realized that I went right to cleaning the main body and did not tell you to clean all of the little "tunnels" on the bottom of the float chamber.

The hole and passage in the main body is a little smaller than my WD40 straw, and when I try to spray fluid in it with the WD40 straw is spews back out. It seems to be clogged. I assume it the fluid should come out the tube that protrudes into the main chamber?

Any suggestions?

Jim
 
See? Ain't this fun?.....Sorry, couldn't resist.

Yes, it sounds like that passage is plugged. Quite common. And, that is a GOOD thing isn't it? To find something wrong that we can fix to get your outboard going? It's way better than the old "I can't find anything wrong" so you don't know where to go next.

Ok, getting that passage clean can be a real pain. Do you have the "jet set" out? Item # 18 and 20 in the link below.

http://www.boats.net/parts/search/H...6/BFP9.9D6 LHTA /CARBURETOR (AUTO)/parts.html

What you have to do is prop the throttle linkage open so that you can see all three orifices at the top of the carburetor throat. I use my little pocket screwdriver wedged in the linkage to keep it wide open while I work. The orifices are tiny little drillings arranged in a sort of triangle pattern at the back top of the venturi (throat). One of them is the idle orifice and can actually be seen when the throttle plate is closed. The other two are the transition and main orifices and cannot be seen or accessed with the throttle closed.

In order to clear that pump passage, you need to flush, then backflush, then flush, then backflush until it is clear. If you have the jet set out, put it back so that you can hold your finger over the tube so that you can plug the passage there and force the cleaner to take a direct path to and from the orifices. Take the straw from your carb cleaner and carefully position it over either the main or the transition orifice and give it a good shot. Then, still holding your finger over the jet set, you go back and shoot the passage. You must keep doing this, back and forth, until you get it to flow. It can take a while. I have never had one that I couldn't get working but there is always a first time I guess.

You will know when that passage is clear when you shoot into the feed side and carb cleaner comes out the back of the carb throat in a 6 to 8 foot stream! Don't spray it into your eyes.

Standing by.

It is getting late, so I will have to work on this tomorrow after Church.

Will let you know the result.

Thanks

Jim
 
Ok, I'm just going to put down some words on the idle circuit. You have the idle screw out and there is, pretty much, a gaping hole there in the body where it goes. To get that all clean in there, you need to pretty much do the same thing as you are doing to try and clear the accelerator passage.

That idle circuit is connected to the main feed from the jet set so, when you spray into that hole, you expect to see cleaner come from the idle orifice in the throat of the carb. but it will also tend to take the "path of least resistance" and escape out the main channel back through the jets. So, if you plug the jet and the accelerator passages, then more of the spray force will be directed through and out the idle orifice in the throat.

The idle passage is a much smaller drilling so, you will expect much less spray to come out there. More like a forceful waterfall than a 6' stream. Here, again, you will want to plug the jet and accel passages and spray in the hole where the idle screw goes and have a flow out of the orifice. Then, doing a backflush, point the straw over the orifice and force the spray to come out of the idle screw hole. THEN, put your finger over the idle screw hole and leave the jet unplugged. Holding the spray straw over the idle orifice, spray and force the fluid to come out the jet and NOT the idle screw hole.

I hope you can see how this is "scrubbing" the little passages of any debris that may be in there. Outside of using a high quality ultra sonic cleaner, this is pretty much the only way to get them cleaned out.

Eventually, after you get that accelerator passage unplugged, you will want to do the same to the main passageway. This is done by spraying the main orifice while holding your fingers over both the idle screw hole and the inlet from the accelerator passage while having the cleaner gush out of the jet hole. Then still holding both those passages closed, spray back through the jet and have the main force come out the orifice.

As you do all this, you will be observing other passages that will "bleed" a bit of fluid. One of them is the enrichment passage from the autochoke. That needs the same treatment as well as the vent passage. identifying "leaks" and plugging them, then spraying and back spraying, will eventually get the all the passageways clean. If you pay attention to these "leaks" you will start gaining an understanding of how this carb works while, at the same time, getting it squeaky clean inside.
 
To insure that I am working on the correct passage I am posting this link to my facebook page that has these 3 pictures with some pictures of my wife and I.

http://www.facebook.com/media/set/?set=a.1412622035686.2059504.1236592916&type=3

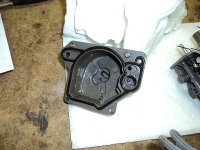
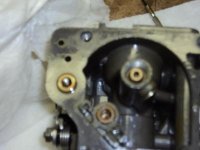
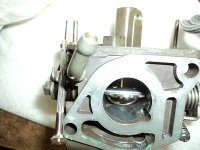
The passage I am working on starts with the upper right hand hole in the bowl picture. This passage looks as if it has a screen over it. This passage then connects to the upper left hand hole in the main body picture. And that passges connects to the orifices in the throat of the main body picture. Looks like 3 to 5 holes in the shape of a triangle

Let me know if you can't access my profile pictures.

Jim
 
Sorry, just saw this. And, sorry, I don't do facebook. But, even if I saw the pictures, I constantly get those passages mixed up when I try to visually identify them so I always spray through the accelerator pump passage in the bowl and compare where it exits to the mating passage in the main body to be sure myself. That's not working for you I take it?

I don't have a carburetor apart right now to do the comparison. It might be a couple of days before I can get to one as I am helping my wife with some medical issues and we are going out of town.

You can't post the pics here?

bowl main passage.jpgmain body passage.jpgOrifices.jpg

I figured out how to post the pictures here. From what I can see the hole I am trying to spray thru in the main body goes to the main chamber and that hole in the main chamber has a small rod sticking into the chamber.

I will keep your wife's medical issue in my prayers.

No hurry, can wait till you get back in town.

Jim
 
JUst a few words before I leave. In the middle photo of the carb body, there are three "holes" on the left upper side above the accelerator pump plunger. One is a bolt hole, one is an alignment hole and the one closest to the plunger should be the hole that feeds the main. If you spray in there and are getting "blowback" then it is plugged.

Do this:
I see that the jet set is in place. You know, that little tube that goes up from the fuel chamber and into the center of the carb throat? Have you had that out yet? I know I told you to put it back but if you did, take it back out. If you haven't had it out, then it needs to come out anyway at some point.

Let me know. I can get my email on the road.

Thank you for your prayers. They are needed.
 
View attachment 5092View attachment 5093View attachment 5094

Here are some more pictures. The first 2 show the path of the hole that is farthest from the plunger and its path into the main chamber that has the small rod in the hole I have been trying to clear. Can I assume I don't need to worry about clearing this? The third picture shows the hole closest to the plunger and the place that fluid comes out (circled in white) down in the bottom of the main carb body. The only way I can get fluid to come out the single hole orifice and the orifices in the triangle shape is by spraying fluid into the hole that I took the pilot screw out of. I had taken the jet set out and had put it back. I now have it out again.


What are your thoughts?

Jim
 
Well, I'm getting an error message when I click on the picture attachments. I'm going to send you a PM with my Email address. Maybe that will make it easier for you to send pics.

In the meantime, try sticking the sprayer straw up into the cavity where the jet tube goes up into the carb throat. You should get a pretty fair stream coming out of the orifices by doing that and it may help start to clear the accelerator pump passage. It is becoming pretty clear that this little baby is pretty clogged up!

Also, try and locate some multi-stranded copper electrical wire if you can. Automotive stranded wire makes an excellent "roto rooter" if you take some and peel the insulation off and use one strand to get into the little holes.

You just need to be very careful not to break a piece off in there by working it around too much. That could be impossible to get out if it gets stuck. But, it sounds like we may need the extra force to dislodge some crud.

Patience and perseverance will get it done.
 
My engine will start and idle for about 10 seconds. I change fuel filter with no change in starting issue. If I pump on fuel line blub it runs a little longer before dieing. All connections and connector valves seem to be fine on fuel line to gas tank. I pulled the fuel filter and it seems to have vacuum, but I can't open it up to check diaphram because of star shaped screws that hold it together. any suggestions.
I had the same problem with my 2004 Honda 9.9, there is a temperature sensor that will trigger after a few seconds running without adequate cooling, my problem was fixed with an impeller change. Honda recommends replacing the impeller every 2 years. Make sure you have a good strong telltale after starting before revving the engine.
 
Back
Top