Logo

Steering - 1989 Johnson 110HP 2 Stroke

Byte

Regular Contributor
I had my boat trucked from one side of Australia to the other side (East to West) late last year.

In their travels, they damaged a few things.

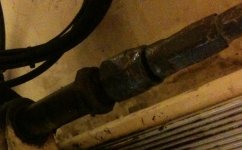
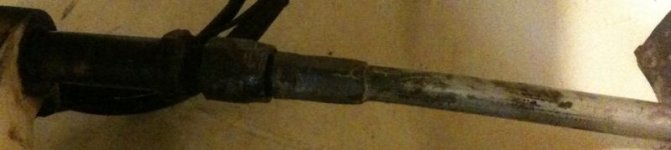
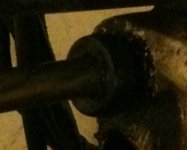
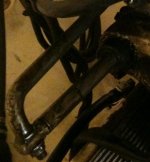
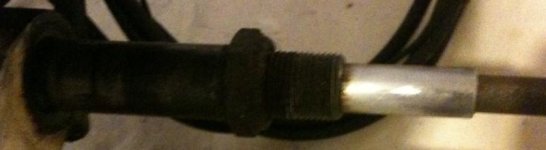
One of these things was the steering - as they manually forced the engine up - the seal on LHS (standing on ground facing rear of boat) steering rod popped out and caused the weight of the motor leaning it's weight on the steering rod and not being able to be moved. I have popped this seal back in it's place, but popped out again after some attempts of steering the wheel and I do not know how to ensure this seal stays in it's place now.

Also, I cannot steer the motor to the right any more (standing on ground facing rear of boat). For some reason, something feels like it is jammed or siezed.

Any thoughts on these 2 issues would be much appreciated.

Byte
 
I've read your post over a few times but cannot visualize this "steering popped out" problem, assuming that the steering method is mechanical cable steering.

Normally, thru someone else's carelessness, what happens is that the steering rod becomes slightly bent just outside of the engines steering tube, then jams as it is pulled into the tube. This scenario requires either straightening the bent portion if possible or replacing the steering cable.

If this isn't the problem you've encountered, a few pictures might help to clarify.
 
LHS - Hydraulic steering.
However to know which type of steering you have, we need a pic or further spec as it is not a OMC original one, but some other brand.
 
Thanks for replies.

The steering is OEM original Johnson circa 1989.

It is not hydraulic steering, but mechanical steering.

LHS = Left hand side.

"Steering popped out" = Seal on LHS (standing on ground facing rear of boat) steering rod popped out.

I will try to insert some pictures shortly.

So, basically, I cannot turn the steering wheel any further to the right to turn the motor form central position to the RHS (Right Hand Side).

Thoughts?

CH1968
 
OMC/Johnson/Evinrude never made any steering's for the outboards, mechanical or hydraulic with the exception of the power-steering on the V-8.
Most likely a Teleflex or similar connected to the steering tube.
You probably have to remove the cable from the steering mechanism and engine to figure out what has happened.Might be a broken cable, might be a damaged helm.
The only part that is pure 'Johnson' in the system is the tilt-tube on the engine and possibly the connector from cable end to engine steering arm.
 
Thanks for the clarification. My mistake for thinking OMC made steering assys.

How do I remove the cable from the steering mechanism and engine?

How do I check if the helm is broken?

Dumb question - what is the helm?

Attached are pictures showing both side of the steering rod (Seal on LHS). Apologies for the scum and dirt shown in these pictures.....

THoughts?


CH1968
 

Attachments

  • IMG_2046.jpg
    IMG_2046.jpg
    49.7 KB · Views: 133
  • IMG_2045.jpg
    IMG_2045.jpg
    17.7 KB · Views: 119
  • IMG_2044.JPG
    IMG_2044.JPG
    52.6 KB · Views: 119
  • IMG_2043.jpg
    IMG_2043.jpg
    60.1 KB · Views: 159
Update.

I now know what the helm is.

I contacted my local outboard dealer and helped me out.

I have decided to replace the cable and steering mechanism in the helm.

But, I cannot completely remove this cable from the motor.

Attached photo shows how close I am.

Tips to extract this final bit of cable from motor?

Will this motor still be intact and connected to the midsection after the cable is removed?

I woudl hate the motor to fall on my legs/feet.
 

Attachments

  • IMG_2048.jpg
    IMG_2048.jpg
    19.3 KB · Views: 102
If you just bought this boat and trucked it accross Auzy land , it must have been a good deal-----------------I am guessing you bought someone else's problem , and nothing to to with trucking it.
 
Looks like someone has used a hammer on the side where the steering connector goes to the engine. The end-eye has been deformed.
If possible, try to force the cable back in again, take a grinder and cut off the end piece with the eye, then pull the remains out.
Nothing will happen to the engine as long as you do not damage the tilt-tube.
 
Racerone - I have owned this boat for 5 years now and yes, I admit have neglected this boat for a couple of years as it has been in storage for that long and sitting and moving from state to state.....

Haffiman37 - What side are you referring to (where the connector goes to the engine - LHS or RHS when facing rear of boat)?

Is the end-eye you refer to noted in the last photo of post #6?

Is this end eye actually part of the cable (probably dumb question)?

How much should I grind off form the end-eye?

Is the tilt tube holding the engine on the transom?

CH1968
 
Last edited:
Racerone - I admit have neglected this for a couple of years as it has been in storage for that long and sitting.

Haffiman37 - What side are you referring to (where the connector goes to the engine - LHS or RHS when facing rear of boat)?

Is the end-eye you refer to noted in the last photo of post #6?

Is this end eye actually part of the cable (probably dumb question)?

How much should I grind off form the end-eye?

Is the tilt tube holding the engine on the transom?

CH1968

The tilt tube is the tube going through both engine brackets which the engine swings around when tilted.
Normally the cable enters from STB side and is attached to the tilt tube with a big nut.
Goes through the tube and comes out on port side ending in an 'eye' where the steering connector goes.
Normally you remove the cable by removing the steering connector on port side from cable, unscrew the not on STB side and just pull out the cable.
However it is a tight fit and if the end tube of the cable is slightly bent or 'someone' has smacked the end piece with a hammer or similar, it might be a problem getting it out.
Don't worry, the only part that belongs to the engine is the tilt tube with threads (Both stb and port side) which the big steering cable nut is attached to. Whatever comes out on both sides of this tube are cable parts!!
 
Thanks.

I was able to extract the whole lot without cutting anything off now.

I will now uninstall the entire cable, measure up and obtain a new one.

Tips/traps for next steps (i.e. uninstall, ordering correct length, type, etc..)?

CH1968
 
THanks.

I shall investigate further.

I pulled the cable - it says "TX COntrols 9.16".

I measured it at 8.4m.

So what measurement is correct when ordering a new cable?

Also, I am thinking of raising the steering wheel up around 200mm, so obviously I will have to increase the new cable length length to be a bit longer.

ANd, how do I remove the steering wheel from it's base at helm?


CH1968
 
TX used to be a Swedish company, now taken over by Teleflex Marina which used to be named Teleflex Morse.
Steering wheels might be a bit tricky to get off, mostly this way works:
Take out the wheel center and unscrew the nut until flush with the steering shaft.
Have a big hammer at hand!
If possible, sit down and press your legs UP against the steering wheel, give the center a hard knock with the hammer.
Using pullers etc will often damage the plastic steering wheel.
Do not smack the steering wheel without having the pressure from the back, you will only damage the dash board and risk knocking out your instruments.
If totally corroded, you may have to take the helm apart from the back and pull out the wheel with the shaft attached.
Old steering systems may be a bit corroded and tricky.
Check the 'measurement video' in the link above to get it all correct.
 
thanks - why have the nut flush with end of steering shaft?

what does "9.16" mean (stamped on cable)?

CH1968
 
Gives a bigger surface to hit, protects the threaded part in case you want to re-use the helm assy, keeps the wheel from popping totally off and you loosing balance if using your legs as 'counter' for the wheel!
Most cables have production date codes stamped to be able to identify in cases a 'serial' problem occurs.
Sometimes the code is internal, sometimes it is month and year, sometimes it is production lot, sometimes it is year and week. You should even find the length of the cable stamped somewhere.
You find most of the info in the Teleflex catalog.
 
I have had a look at your link and I really do not know what to select form the too many choices listed on that site.

I have looked at this site and see similar issues, but may help..... http://www.teleflex.com.au/Print_Catalogue.aspx

From end to end, I measure 5.22m (17.13 feet).

How do I select a cable from these sites to accommodate my needs?

ALso, what is a bezel kit?

CH1968
 
Thanks.

The attached pics show my current helm.

I know - basket case, dirty, scummy, etc - but I want to obviously make good this area and do whatever i can to revamp this area - which will include raising my steering wheel about 200mm. I am also considering trimming off the bottom area to allow more leg space.

I want to possibly relocate that small sounder into a lower space that could sit in the area of where the wheel will be sitting. THe only other instrumentation I plan to have mounted is the Odometer, Trim and Tilt guage and switch mechasim (shown in bottom left hand corner - black).

I understand fiberglassing needs to be carried out and ask for ideas on where to start....

Thank you.


CH1968
 

Attachments

  • IMG_2059.jpg
    IMG_2059.jpg
    63.8 KB · Views: 89
  • IMG_2061.jpg
    IMG_2061.jpg
    57.1 KB · Views: 90
  • IMG_2060.jpg
    IMG_2060.jpg
    68.7 KB · Views: 85
Last edited:
Where to start?
Get a drill, drill some 3-4mm holes in the circular nut holding the helm to the bezel, crack the nut and the bezel will fall inside!
Then clean out so you may see what to do.
Get some 3mm ABS sheets, mold-wax them and cut to fit behind the openings you want to cover.
Chafer the edges with a grinder, attach the ABS sheets at the back and cover from front with glassfiber/polyester.
Where you want the steering system, be sure you use some 12mm marine plywood and glass in to the get the thickness needed.
When all cured, remove the ABS backing, paint with top-coat, and polish up to wanted gloss. A time consuming job ahead!!
 
thanks.

What is the bezel and how does it differ to the helm?

Is mine 90 or 20 degree?

How do I actually remove the the steering flange / assy from the fiberglass shown in the pics?

what do i use to mold-wax the abs sheets?

what does mold waxing mean?

how do i ensure the plywood is rigidly secured in place before i glass it in?

CH1968
 
Your Bezel is the 90 degree round alu part mounted on your dashboard with 4 screws.
The helm is held in place in the bezel by a round nut with 2 or 4 slots and normally need a special tool to remove. (Teknoflex who made this, normally supplied this tool with the helm kit). However corrosion normally makes it impossible to remove after some years, to remove drill some holes and crack it!!
Round-Nut.jpg
You need something backing up when covering the holes with glassfiber. You may use some thin plywood, but then have to glass on both sides and it will rot after some time. Using some 'plastic' waxed with the same wax used in the mold when producing boats, will let it go easily afterwords.
 
thanks.

i have removed those 4 screws and able to move the bezel out form the dashboard, and will not come away from the dash - but the shaft assy is preventing me from removing it completely from the dash.

does this mean i need to buy the special tool to remove this bezel?

how do i ensure the 12mm marine ply wood (used to mounted steering assy) is secured first before I glass it in - sorry for not understanding..

CH1968
 
You need to drill some holes in the round nut and crack it!
Glue the wood with Sikaflex (bonding silicone) or similar first.
 
thanks - i think i understand now. When you say 'crack it' - do u mean crack it free so that it can move or literally break it?

If to set it free, which way do i crack it - CW or CCW?

When u say "crack the nut and the bezel will fall inside" - what will the bezel fall inside to?

Should I glue the wood on top or on underside of existing dash?

Do the ABS sheets get cut to fit inside the holes or placed over area form underside?

I assume the fiberglass matting will not stick to the ABS sheets?

CH1968
 
If you drill 2 4 mm holes exactly where the slots are on the not 180 degrees opposite each other, put the wheel nut on the shaft 'flush', give a hard smack and probably the nut will split in two and the helm unit 'fall' inside out of the bezel and all parts are free!!
If you want to 'lift' the steering 20 cm, it looks like you will have to do a major re-do of the whole panel.
I may give some basic about 'how to', but not in detail re-design it.
If you are not familiar with glass fiber/polyester work, it might be both easier and cheaper to let someone do it for you, but make a design drawing first!!
You may either 're-build' on top of present panel with thin plywood and glass over, then cut/grind away at the back what you do not need/want, or just patch up the holes and keep panel as is in design.
Just 'google' a bit about glass fiber repair and design. Might be a messy and itchy job!!
 
Back
Top